
This is the first time I am doing anything with electronic paper, and a Raspberry Pi for that matter. Getting it all up and working was quite fun, though frustrating at times.
The Raspberry Pi’s are really very cool. With such an active community, it is easy to put them to good use.
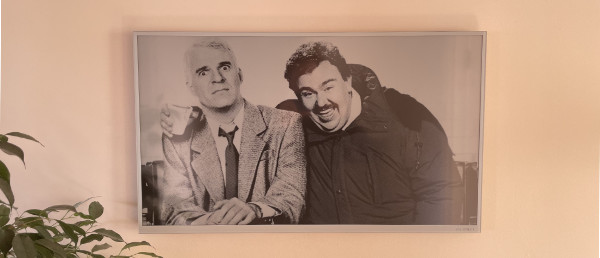
The Visionect Place & Play 32″ is absolutely amazing. Having that much ePaper opens many doors as to what you can present on the screen. I’ll probably do another post on that later, but here is an example: a collection of info and puzzles for the kids every morning (fixed at the ratio of the display). It really looks great on the wall.
I should mention that Visionect offers a reasonably priced Cloud Plan which will allow you to skip the entire set-up process below, and go straight to creating the content (more details in update 4 below).
Now, let’s get going!
BOM – Bill of Materials
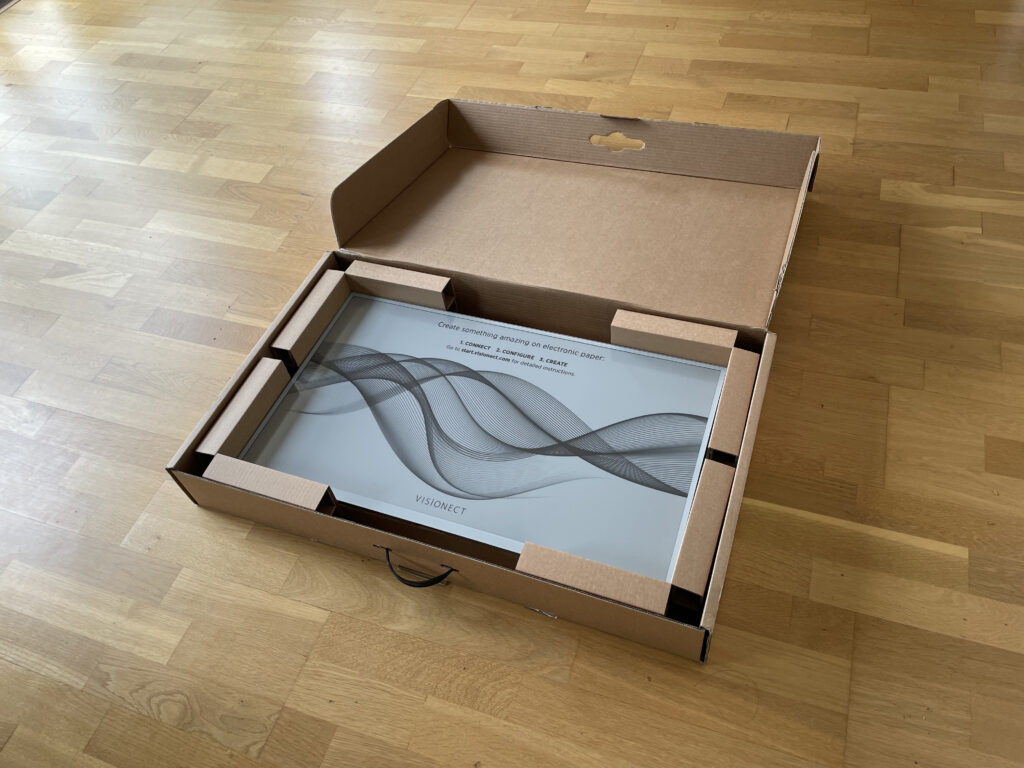
- Visionect Place & Play 32″
- Flat to Wall Low Profile VESA Mount (Amazon).
- Micro SD card with minimum 8GB (32 GB Amazon).
- Raspberry Pi 4 Model B with 4GB memory.
- FLIRC Raspberry Pi 4 Case (optional).
- A power adapter suitable for the Pi (5.1V with 1.2A).
- Power cable from power adapter to a micro-B USB plug.
- Wired keyboard & mouse via a single micro-B USB plug.
- HDMI to mini HDMI adapter/cable to setup the Raspberry Pi.
- A screen with HDMI port for the Pi.
I mounted the screen on a concrete wall, which meant I needed:
- Bosch PSB 500 RE Hammer Drill
- 10mm Masonry drill bit for the expansion plugs
- Screwdriver Bit Accessory Set for the wall mount screws
- A spirit level to and a marker to align the screen
- 9-10 mm machine screws for the VESA mount
The expansion plugs, and screws needed to put the wall mount on the wall came with the mount. But the screws that was intended for the screen didn’t fit, neither did the washers.
Links to visit from the Mac
Downloads for the Mac
- Visionect ePaper Screen Configurator needed to specify the IP address the screen should use to fetch content to display.
- The USB driver required to connect with the Visionect display to allow the above Configurator to setup the display.
- The Official Raspberry Pi Imager to setup the micro SD card needed by the Raspberry Pi.
Links to visit from the Pi
- The YAML file to setup the environment for the Visionect Software Suite running on the Pi.
Wall mounting the Display
The display itself is quite handsome. However, I think at some point I might frame it so it blends better with the other picture frames I plan to hang around it.

In the BOM you will find the thinnest wall mount I could find. However, the screws that came with it, were too long to fit the display – so you might want to buy a new set of 9-10 mm screws.

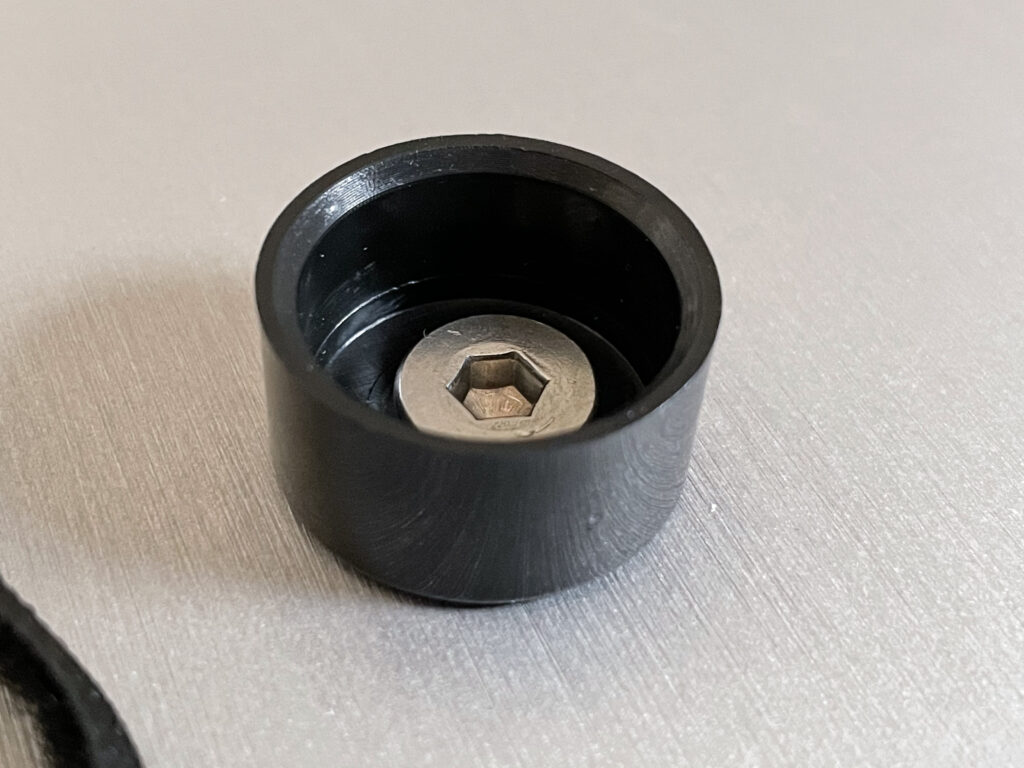
The mount itself is straight forward. To get the screen as close to the wall as possible, I decided to not use the nylon spacers that came with the mount.

To avoid damage to the wall I used the guards. They also ensured that the screen hung parallel to the wall. Very happy with the result.
Charging the display
To charge the screen you can use any power delivering micro-usb cable. I’m using the cable from the Xbox charging kit, as it’s long enough to reach the outlet while the screen hangs on the wall.


Preparing the Raspberry Pi Software
I bought a Raspberry Pi 3, with a really nice FLIRC case (just in case the Pi stays visible).
First I formatted the 32GB micro SD card using the recommended tool from SDCard.org: https://www.sdcard.org/downloads/formatter/
Then I downloaded the official Raspberry PI Imager which when run, let me pick which operating system to clone. Since the Raspberry will be accessed via SSH, I picked the minimum installation (0.4GB).
In the imager I picked the OS installation, configured the OS to use WiFi and SSH, selected the SD card, and finally pressed Write.
After verification the SD card was ejected from the Mac and installed on the Pi (the case has an access port for the memory card).
Raspberry Pi Setup
With the SD card installed and ready in the Pi, I connected the Pi to my laptop using a Shadowcast and Genki Arcade (download link on the product page) and wired Apple keyboard to the Pi. Traditionally you would simply hook the Pi directly to a monitor using an HDMI cable, but with the Shadowcast I can set up the Pi without the need of a second monitor.
Tip: If you use the Genki Arcade, go to settings and change the mode to “Favour Resolution” for a perfectly readable image.
Finally I hooked the Pi up to power, which booted it up. Now it was time to prepare the required environment for the display.
The Visionect web page points Pi users to two different web pages:
- 32-bit ARM build of Visionect Server contains the YAML content you need for docker-compose, which creates the environment for VSS.
- The Getting Started instructions for the Visionect Software Suit for embedded boards (how to configure the screen).
First I started with updating the Pi:
sudo apt-get update && sudo apt-get upgradeAfter that I installed docker and added my user to the docker group (as suggested at the end of the docker installation):
sudo curl -fsSL https://get.docker.com -o get-docker.sh
sudo sh get-docker.sh
sudo usermod -aG docker pi
Then from this page https://hub.docker.com/r/visionect/visionect-server-v3-armhf/ I got the command to pull the ARM version of the Visionect Software Suite:
sudo docker pull visionect/visionect-server-v3-armhfThen I installed docker-compose:
sudo apt-get install docker-composeTo create the docker-compose.yml file I copied the content from the web page and pasted the content:
nano docker-compose.ymlThen I exited nano, which prompted me to save the the file.
After that I launched docker with the following command so it restarts after reboot:
sudo systemctl enable dockerAnd then I rebooted the Raspi.
After that I ran the docker-compose command:
docker-compose up -dWhich caused the the YAML to install the required components with no errors. Excellent! By the way, I made these notes about using docker.
With the container installed and running I was now able to use the browser to access the Visionect Software Suit (VSS) installed and running on the Pi by visiting the IP on port 8081 (I think the link provided in the Configurator after setup incorrectly used port 8080):
http://xxx.xxx.xx.xx:8081Setup Apache and PHP
I wanted to use the Raspberry Pi to manage the content for the display, so I installed Apache and PHP—and some additional tools.
Follow the guide to setup Apache and PHP on the Raspi:
sudo apt-get update && sudo apt-get upgradeThen install Apache:
sudo apt install apache2 -yAnd then install and enable PHP:
sudo apt install php libapache2-mod-php -yYou should now be able to modify the /var/www/html/ folder with PHP code and see it working.
I also installed the text based web browser w3m:
sudo apt install w3mAnd the image processing tools:
sudo apt install imagemagickWhich prompted me to remove some packages that were no longer needed by running this command:
sudo apt autoremovewhich To fix the file ownership, I ran this:
cd /var/www/; sudo chown -R pi:www-data .And my content creation platform requires needs rewrites for the request to be enabled, so I edited the apache configuration file:
sudo nano /etc/apache2/apache2.confIn the file I changed None to All in the below section. I also decided to disable directory listings, and enable following symbolic links:
<Directory /var/www/>
        Options -Indexes +FollowSymLinks
        AllowOverride None All
        Require all granted
</Directory>
Then, to allow rewrites with .htaccess files, enable the rewrite module:
sudo a2enmod rewriteI also increased the maximum upload file size to 32M. First locate the php.ini file:
php --iniThen use nano to edit the file:
sudo nano /etc/php/8.2/cli/php.iniLocate these settings and change them to 32M:
upload_max_filesize = 32M
post_max_size = 32M
Exit and save the file, and restart Apache:
sudo systemctl restart apache2Now rewrites should work.
Mounting USB Memory Stick FAT32
The files I show on the display are stored on a USB memory stick that I want to mount after rebooting the Raspberry Pi. This way the images are not lost when the Micro SD card eventually is corrupted.
First I found the memory stick device name using this command:
lsblkTo ensure the correct access when mounting the drive, I used the below command to find my user’s uid and gid:
idThen I edited /etc/fstab so the device would mount after boot:
sudo nano /etc/fstabI added the following to the bottom of the file (make sure you use the appropriate disk name found above, and correct uid and gid):
/dev/sda1 /mnt/usb vfat uid=1000,gid=1000,umask=000 0 0After changes to the mounted volumes, I was prompted to reload the system and service manager:
systemctl daemon-reloadAfter that, I manually re-mount the drives (instead of doing a reboot):
sudo mount -aConfiguring the Display
Now that the backend is properly setup and running, I could configure the screen.
I hooked the display to my Mac with a type-C USB to a micro-B USB 2.0 cable certified by USB-IF (both power and data). The screen made a sound, indicating that it is connected and charging.
Then I downloaded the Visionect Configurator and installed it on the Mac, but the Place & Play 32" was not detected by the Mac. I sent an email to Visionect Support, but kept looking for answers – and found it in their FAQ (no troubleshooting section on their site):
MAC users may experience issues utilizing their USB ports when running the FTDI driver. This is due to an issue with the driver software. An update has been issued, resolving the problem.
The USB driver was outdated, but an updated version was available that was signed by Apple. I downloaded and installed the signed driver from the mentioned page, but the screen was still not detected. From my Windows days I learned that a system restart solves many problems, so tried it. When I launched the Visionect Configurator after the reboot of the Mac, the display was detected immediately. Excellent!
I configured the screen to connect to the IP address of the Raspberry Pi. Additionally I reserved the IP address of both the Place & Play 32″ and Pi on the router, to avoid them changing.
The screen uses port 11113 to connect to VSS.
Now that the Mac and screen were communicating, and the screen had been setup to the best of my ability, I moved my focus to the Raspberry Pi and content generation.
Preparing Content
I decided to create a simple web page to show on the screen. So I created a HTML file showing a single edge-to-edge image:
<html>
	<head>
		<title>Benson 1.0</title>
		<style>
		body {
			margin: 0;
			padding: 0;
		}

		div {
			height: 100%;
			position: relative;
			background: white;
		}

		img.aspectFill {
			width:100%;
			height:100%;
			object-fit: cover;
			overflow: hidden;
		}

		</style>
	</head>
	<body>
		<div>
		<img src="./images/myimage.jpg" class="aspectFill"/>
		</div>
	</body>
</html>
I created the image on the Mac and uploaded it to the Pi using FTP.
With the image in the images folder, I verified that the page worked in the browser. Then in the CMS I selected the device from the Devices list, then Change Content > Display web page – and filled in the URI.
Finally I tapped Refresh Content – and the screen updated!
Click here to read more about preparing images and line art for the 4 bit eInk display right here.
Issues with Screen Updates
If you have issued with the screen seemingly failing to update, this might be due to a couple of things—but most likely the Raspberry Pi is simply failing to prepare the content in time.
To fix that issue, you need to configure the display and VSS to ensure enough time and memory to complete the task.
For me however, the issue was initially on the hardware side: I first tried to serve the display from a Raspberry Pi Zero, but it was too slow and weak to get the job done. I then upgraded to Raspberry Pi 3, but I still had some refresh issues.
Finally, I ended up with the Raspberry Pi 4 Model B with 8GB memory.
I believe you might get away with a 4GB model, as during use I have noticed that the Pi has about 6GB free memory.
Analytics
The Visionect software suit has some nice analytics to monitor battery, data transferrals, signal strength and so on.
After 58 days of using the screen the battery was down from 98% to 2% – which is far from the suggested 6 months.
The latest period started at 100% charge and dropped to 1% in exactly 70 days. The period before that was 53 days long.

It’s interesting to see that since 16th of August, it appears like a lot less data has been transferred daily – despite no changes to the backend.
Update 1
Reducing Power Consumption
I reached out to Visionect who was more than happy to give me a call to help me setup the screen to reduce battery consumption. Now the screen goes to sleep between the image updates, and it really helped:

With the new backend settings, it seems like the power consumption has been reduced by 60% – very nice! Seems the screen might be running for more than 6 months without a recharge.
I am still not able to prevent the screen from doing “false” updates: the screen refreshes the content every hour despite the image being exactly the same (unchanged). Not sure why though, as Visionect ensured me it wouldn’t.
Hopefully I can get that sorted as well, so the battery profile is improved even further.
Update 2
Firmware Update—finally a proper fix!
I have now been working for almost a year on my content manager that generates the content for the Place & Play 32″ display. But no matter what I did, the screen would do a refresh—despite the content being the same. This of course waste energy, which means I’ll need to charge the battery more often than strictly necessary.
In my attempts to fix the false refresh I tried everything I could imagine. Eventually I gave up and reached out to Visionect, which promptly replied with a suggestion to update the firmware of the display. Having failed twice to update the Visionect Software Suit (VSS) I feared that updating the firmware and not VSS would create issues, but I was assured it would be smooth sailing. And they were right – the update was applied and nothing broke.
Now I am using Sleep Manager to put the display to sleep between updates. The display is configured to wake up every hour to check for new content. Great!
Before, the battery would drop by 10% after 25 updates. Here you can see the power consumption before and after the firmware update:
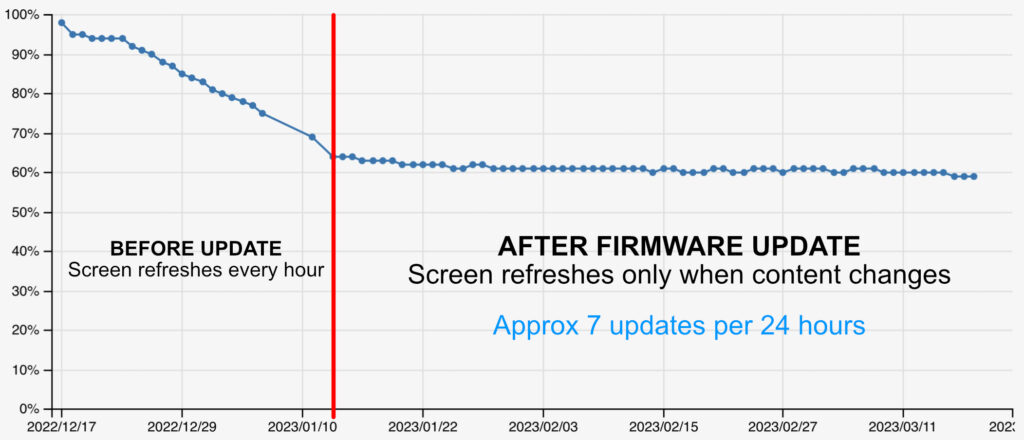
At this rate, the display battery will last almost 6 times longer than before; from 6 to 36 months! Now this is truly Place & Play!
Update 3
Better Documentation and Cloud Services
Getting started with the Visionect Place & Play displays now seems to be easier, as I think their online documentation has improved.
I have not tried this myself, but I think you might have a smoother ride than I had by following this: Getting Started with Place & Play.
Alternatively you can use their cloud subscription, which ensures you are always running on the latest software—which if you read my experience above—can have a big impact on the use and milage of the display. Check out the details on the Visionect web page.
As an alternative to the online Cloud Plan, you have the Essential Plan which enables on-site installation of their software (needed to pre-process and deliver the content to the display).
Updating VSS
I have not been able to upgrade VSS, however I only tried to do a full upgrade which is not recommended (I found that out later). Instead, the recommendation is to only replace the Visionect container itself – and not the Redis nor Postgres containers.
My futile attempts to do a full upgrade however, resulted in the Redis crashing with signal 6 and 11 over and over again:
1:M -12669 Jan 1970 -18:-21:-4.5611
# Redis 7.0.7 crashed by signal: 6, si_code: -6
1:M -12669 Jan 1970 -18:-21:-4.5611
# Crashed running the instruction at: 0xb6b477e6

1:M 01 Jan 1970 00:00:01.000
# Redis 7.0.7 crashed by signal: 11, si_code: 1
# Accessing address: 0x10 1:M 01 Jan 1970 00:00:01.000
# Crashed running the instruction at: 0x4f96c0
In the end, I restored the backup and decided to not upgrade the VSS, as no matter what I tried, I did not manage to do a full upgrade.
But this is not something you need to consider if you use their cloud services.